Building a Quercy Pigeonnier
How We Managed to Build a Quercy Pigeonnier
In search of the perfect house
When we came house-hunting in the Lot eight years ago, we had a wish-list (no doubt like everyone else) which went as follows: an old stone house with exposed beams; a peaceful location but not too isolated; proximity to a village or town with some shops; enough land for a good garden and space for a swimming pool if there wasn’t already one; attractive countryside with a good aspect; one or two outbuildings. After that, the wish-list got more fanciful: a stream running through the land – perhaps even a watermill; a well, a bread oven…. and a pigeonnier.
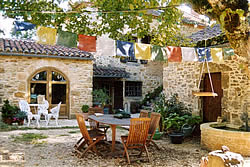
You can dream but of course house-buying is always a compromise; nevertheless we found most of our desires in the traditional Quercy farm-house we bought about 3 km outside Prayssac in the Lot Valley, with a half-hectare of land and wonderful views to the far hills. Inevitably, there was a lot to do – garage converted to make a kitchen, new staircases to replace the near-ladders which connected the three floors, new floors, swimming pool… My husband Michael, a retired architect, enjoyed his many projects and there was always – and still is – a long list of them. He also enjoyed having the leisure to paint and to pursue his latest interest – stained glass. The spare bedroom became his studio, which had to be tidied away when the summer guests arrived – even then, it was perhaps a little hazardous for them, as I might have missed a few shards of glass here and there! So we turned our attention to the barn and converted part of it into a bedroom and bathroom for visitors. But still the spare bedroom in the house wasn’t totally suited to Michael’s atelier.
Even the perfect house needs a Pigeonnier
 Everywhere you drive in the Lot, you see pigeonniers of many shapes and sizes, attached to houses and barns or even freestanding – but always most attractive. We admired them, photographed them … and wished we had one. Michael began to doodle Pigeonnier designs, the doodles became proper drawings, and finally became a Planning Application – a Permis de Construire. We had decided, if the house didn’t have one to start with, it was going to have one now! Once we had obtained the Planning Permission (with a little help and advice from our French neighbours), we took our drawings to Monsieur Faubel in Condezaygues (what a tongue-twister!) in the Lot-et-Garonne. He had been recommended to us and as we stood in his office, we could admire the photos of the traditional-style building he had done and we felt confident that we had found our man. Michael had decided on a solid oak framework, which would be in filled in a traditional way with small bricks – and of course it would have the familiar pointed witch’s hat roof. The Pigeonnier would be attached to our barn and would comprise one square room on stilts, accessed from the upper floor of the barn itself. M. Faubel seemed to understand exactly what was required, visited the house a few times, offered some suggestions of his own, and we agreed to go ahead.
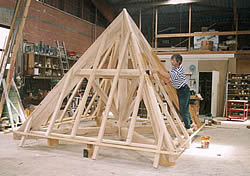
At last came the exciting day when M Faubel rang to invite us over to his workshop, a vast hangar, with our paintbrushes and a large pot of varnish! As he pointed out, it would be much easier to do this when the pigeonnier was in pieces on the floor than when it was in situ – particularly the pyramid of intricate timbers which would form the roof. We spent three days there – there was a lot of wood! The varnish we used had several functions, including protection against insects.
The Pigeonnier takes shape
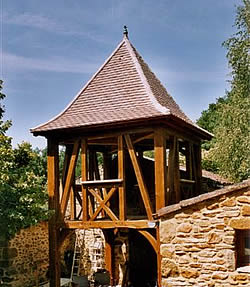 On a hot day last July, M Faubel eased a huge lorry with a crane into our drive with some difficulty as it was loaded with the pigeonnier pieces, which had become festooned with bits of trees from our exceedingly narrow lane! Accompanying him was another lorry and three young men. Within a few hours, the basic framework was up, hoisted up with the crane. Each of the huge posts rested on reinforced concrete bases that Michael had built in advance. Fascinated, we watched and took photos. Our neighbours, Ermès and Françoise came round for a look. Other curious neighbours appeared, full of admiration for the impressive oak framework. The next day, the witch’s hat roof – all in one piece – was hoisted on. The day after, the witch’s hat turned silver – the insulation. Then it was battened, the roof tiles put on … and after seven days, it was done. We are used to French workman working hard morning and afternoon with no British-style tea breaks, but disappearing for the statutory 4-course lunch. Not these however! Every day, they picnicked in our garden and cracked on with the work after only a short break.
I felt full of admiration for Michael’s vision and design and equally so for M. Faubel’s expertise, craftsmanship and aesthetic appreciation. The framework was so beautiful that many people felt we should leave it as it was! But an open framework wasn’t going to provide Michael with a studio and we needed to find where to buy briquettes – very small bricks, traditionally made. Our first enquiries for these drew a blank until someone reminded us of the family-run Tuileries at Condat, near Fumel. The proprietor was interested to hear about our project on our first visit there and pointed out his hand-made roof tiles, which would give the patina and appearance of an old roof, in keeping with the local architecture. M.Faubel was happy to use the hand-made tiles, once he had satisfied himself that they would be durable and frost-proof. We also bought the finial – the object topping the pointed roof – at Condat. This was a pottery dove and putting it in place was the last job on the roof; one of M. Faubel’s boys turned it this way and that until we agreed it should stay flying permanently south!
The finishing touches?
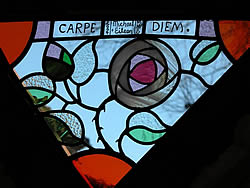
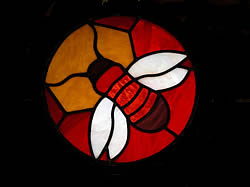
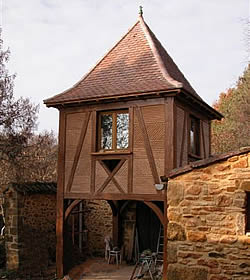 We had observed how the brickwork infill on old buildings is somewhat higgledy-piggledy and Michael wanted to put a feel of that into the Pigeonnier. He worked out a design which would apply to each side: the first few courses horizontal, the next courses diagonal to the left, more horizontal tiles, then diagonal to the right and finishing with horizontal courses. He embarked on the very slow and meticulous task of laying no less than 1000 briquettes – and slowly, slowly the pigeonnier took on a different – and no less lovely – appearance as it acquired its walls. Below the windows (made and installed by a local craftsman) two crossed beams formed four triangles and Michael thought he would see what a stained glass window would look like in one of the triangles – the Pigeonnier was after all going to be a stained glass atelier. He designed a simple one based on a rose and this worked so well, he decided to incorporate a small circular window in the rear wall. Off-the shelf circular windows turned out to be ridiculously expensive, so Michael hit on an ingenious idea; down to the hardware shop for a plastic washing-up bowl, cut the rim off and fit the window into that! Believe it or not, this solution worked brilliantly and a window depicting a bee in reds, oranges and white now catches the evening light.
The framework went up quickly but the next stages have been slower. Internal walls, including insulation, the floor and power supply remain to be done, but I am confident I will have my spare bedroom back very soon and Michael will be installed in his splendid atelier in the pigeon loft!
© Eileen Fawcett 2005
Share to: Facebook Twitter LinkedIn Email
More in countryside, courses, garden, land, renovation, summer, villages
Leave a reply
Your email address will not be published. Required fields are marked *

